
Social Media Project
Year 2: University Project
Social Media Brief
Develop two social media accounts, LinkedIn and one other of your choice.
-
University project
-
13 Weeks
-
Illustrator
Photoshop
Procreate
After Effects
Canva
The social media project for DM2113: Design Practice A module is a University Project where the brief required us to develop two social media platforms. The first one was LinkedIn as it was mandatory for the course and the second platform was one of my choice. The platform I chose for this project is Instagram.
Below you will find my process, analysis and reflection on the project.
Design Thinking

Before starting any project for year 2, I wanted to make sure that I incorporated the Design Thinking principle into my work. This was one of the main comments for improvement that I got last year and therefore, thought it would be good to have this diagram above as a guide while I did all my design work from now on.
Empathise
For the empathising stage, I created a persona to make sure I understood my target audience and their needs. This gave me an insight as to how to present myself on social media, as well as cater my posts to what my persona would want to see. This helped me stay consistent and focused with my content.
Ideate
The ideate stage contained my research into the social media platforms, creating my personal branding, researching other creators and accounts for inspiration and creating a posting plan and schedule.
Define
Defining the problem for this project was a little difficult for me since the brief was so open and generic. There was not a specific client that had a problem to be solved. In saying so, I did find that creating my branding and social narrative had clarified for me which areas I needed to focus on for a successful project.
Prototype
Prototyping for the project was not creating the traditional product, as there was none to create, but rather going live on the social media platforms and working on my social media strategy to grow my accounts.
Test
For this particular project, I found that the last step of ‘testing’ was switched around with the prototyping stage as that is where my research and social media strategy was put to the test. For this project, I replaced the testing stage for feedback, analytics and my reflection on the project.
Emphasise &Define
For the empathising stage, I created a persona to make sure I understood my target audience and their needs. This gave me an insight as to how to present myself on social media, as well as cater my posts to what my persona would want to see. This helped me stay consistent and focused with my content.
Narrative
The most important part I wanted to figure out before starting the project or even thinking about the next few steps was to figure out what I want my narrative on social media to be. This was extremely important, as this would influence how I presented myself on social media, what voice I used, and what audience I would attract to my accounts.
Choosing a narrative was quite easy for me, as I knew early on in my university career that freelance was the area I was most drawn to. My goal after I graduate is to become a freelance brand designer, therefore the opportunity to start my social media presence early was perfect for me. This would give me enough time to build my social media accounts so that they are ready for when I graduate and will start looking for clients.
Project Goal
I had 4 goals going into this project:
Build my portfolio
Find inspiration from other designers
Interact with the industry
Build my social media following
Target Audience
Deciding on what my target audience would be was equally as important as deciding on a narrative for my social media accounts, as it would influence what type of content I would create and how I would present that content. In saying so, freelance design makes it more difficult to choose your target audience as anyone can enquire about your services and you would not know until meeting or talking to the client if they fit your target audience.
To help narrow down my target audience, I decided to create a persona of my “ideal client” that I would have in mind every time I created my social media posts. This also helped me with staying consistent with my narrative.
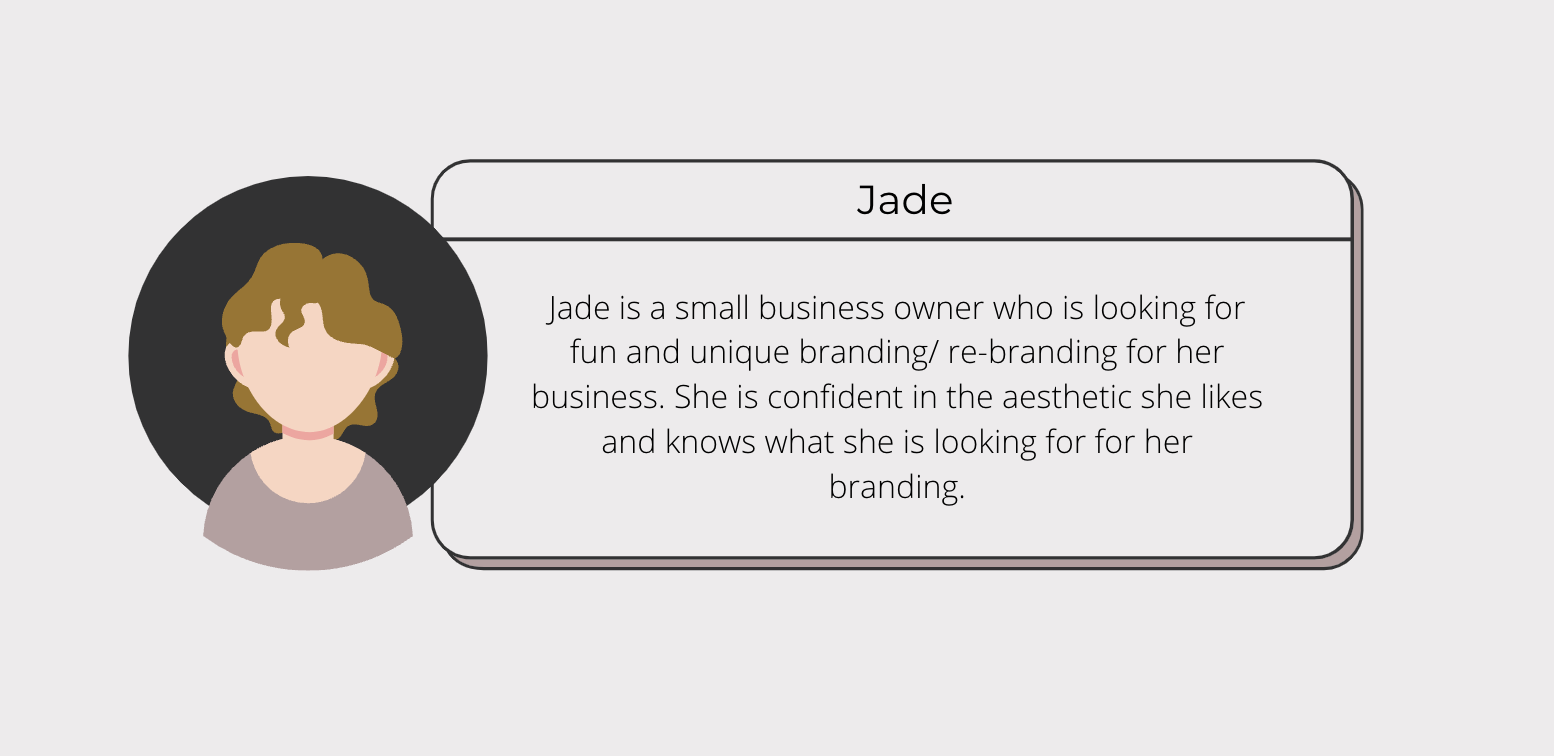
It was important to me to stay realistic with my persona. I am aware that as a designer my work is seen as more female-oriented, which is why my persona is female. I am also aware that I will not be attracting big, household companies (at least not during the beginning of my career), which is why Jade is a small business owner, in the age range of 18-35.
Timeline
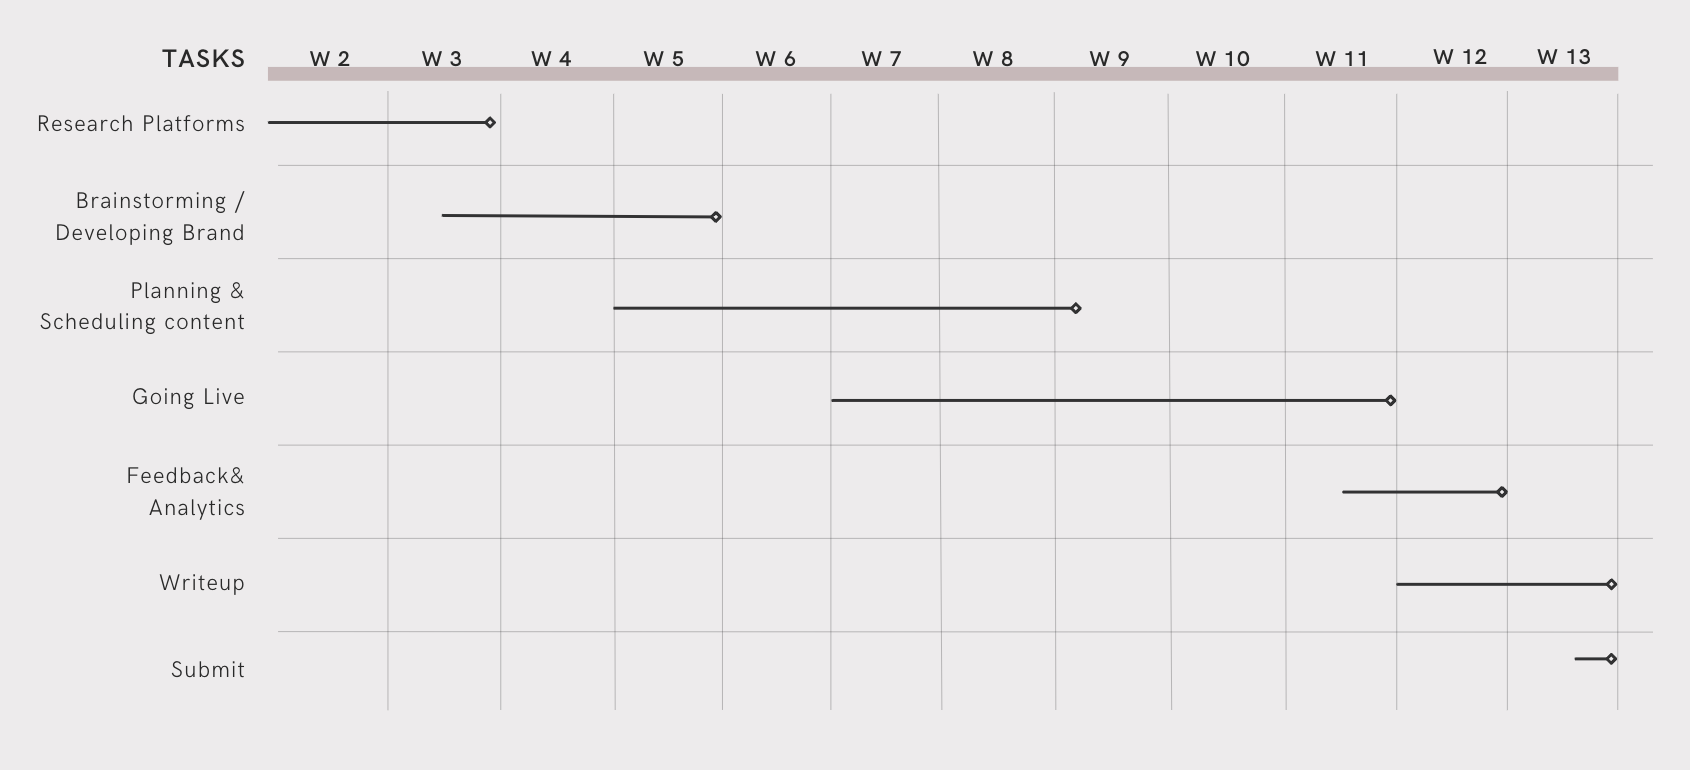
I created a timeline to help me stay focused and manage my time while working on this project. Since we had to go live in week 7, I had to make sure to do all my research, schedule and content before then. Having this timeline as a visual reminder of when things needed to be done was very helpful to me.
I broke down my timeline into the 5 sections of the design process and made sure to leave two weeks in the end for me to write up the project and add it to my website for submission. The first two weeks were dedicated to researching the social media platforms, such as the best days and times to post, what content to post, looking at other accounts and getting inspiration for my own.
The next two and a half weeks were dedicated to brainstorming my social media strategy and creating my branding for my social media and website. Reflecting back on the timeline at the time of writing, I realise that I spent much more than two weeks deciding on my branding, as I explored various styles and colour options before deciding on the final one.
The next step was planning and scheduling the content. This is something that did not end in week 9 as it was originally scheduled for but was an ongoing process all the way up to the end of the project.
Week 7 was when we had to go live on our social media accounts, which is when I started posting. This then flowed into getting feedback and looking at the analytics, while the accounts were live, and making changes as I went.
Finally, in weeks 12 and 13 was the wrapping up of the project, where I started the process of writing it up and uploading it to my website, to be submitted on May 9th.
Ideate/Research
The ideate/ research stage contained my research into the social media platforms, creating my personal branding, researching other creators and accounts for inspiration and creating a posting plan and schedule.
Choosing the Platform
I started off my research by looking into which platform I wanted to choose as my second option. As I mentioned before, LinkedIn was mandatory for this project, though we had the option to choose the second social media.
I knew from the begging that I wanted to use Instagram, as it is viewed as a platform that the majority, if not all digital designers have. What also persuaded me to pick Instagram was that I already had set up an account and had started following designers that inspired me a couple of weeks before this project started. I had not posted or had any followers before this project, but the account was made, which made it more convenient for me to start using it.
In saying so, I knew that I had to do some actual research into the platform and see the pros and cons of Instagram before making my final decision.

Social Media Strategy
Through my research, I found that successful Instagram influencers have a social media strategy. A social media strategy is essentially outlining your goals and the tactics that you will use to achieve them.
As mentioned previously my goals for my social media platforms are to: build my social media following, build my portfolio, find inspiration from other designers and interact with the industry.
The way I planned to achieve that is by:
Using concept briefs to create the content for my feed
Using relevant hashtags, that will help me get my work to the target audience faster
Actively engage with my audience, reply to comments and dm’s
Actively engage with other accounts
Make consistency a priority and have a posting schedule to allow me to have the post ready beforehand
Make my feed as aesthetically pleasing as possible
Post at the best times for each day
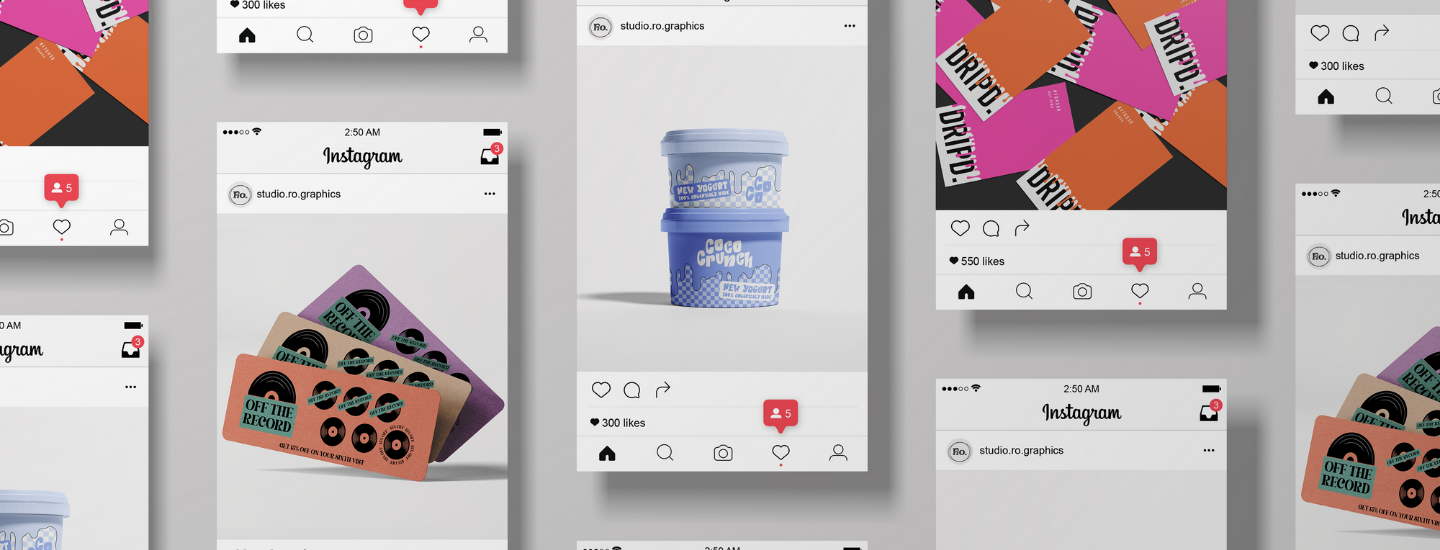
Grid layout
One of my goals in my social media strategy was to have an aesthetically pleasing feed. The way I found to achieve this is by having a grid layout.
While looking for inspiration on Pinterest for my feed, I came across the image on the left. The gird pattern that is circled, is the one that caught my eye and gave me the inspiration to make my feed look as it is now (as seen on the right).

The reason I liked that grid pattern, in particular, was because it made my feed look symmetrical and cohesive even when the grid was not lined up.
Best times to post

A very important aspect of social media is knowing the right days and times to post. I have read multiple articles and blog posts from people with over 50k Instagram followers (all referenced further down) and noted down the times they mentioned were the best times to post. Those times make up the first row of the table above.
The second row of the table is the times my Instagram analytics show are the best times for me to post according to my followers and when they are online.
Comparing the two and seeing how different the times are, proves to me that research is very important and helpful, but unless you try and experiment yourself you can never have a definite answer.
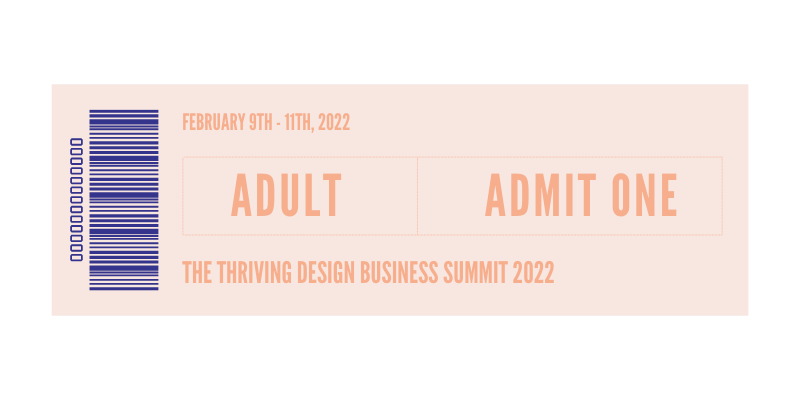
Thrive Summit
The Thrive Summit was an online design business course that I took part in February. It was one of my professors that actually introduced me to it when she emailed us about the event. It piqued my interest and I looked further into it and figured out that there would be dozen of talks from professional designers who are all experienced in the industry and would be sharing their insights and knowledge on how to be a successful designer.
The more I read about it the more I wanted to partake in the summit. So much so that I even purchased the VIP bundle they had on offer, which also gave me access to the recordings of the different courses and all the exclusive content the creators made to guide new designers.
I thought that this would be a good investment to make, as it not only gave me the chance to hear from professionals in the field but was also a great opportunity for networking.
Concept Briefs
It was at the thrive summit that I discovered concept briefs from one of the workshops from the Brief Collective. They are a group of three designers that create concept briefs for new designers to partake in as a way to grow their following and portfolios. Below are some of the key takeaways I got from their workshop.
What is a concept brief?
It is a fictional “client project” or brand that I will be creating purely to grow my experience, portfolio, and design skills, which will help me establish my design style. This will not only help me create content for my social media but also attract more of my target audience and ideal clients, like Jade.
The concept briefs I will be using are from two Instagram accounts that post weekly design briefs. The first one is called @briefclub and the second is @designbyayelet.
The benefits of concept projects:
Helps improve my design skills
Acts as a portfolio piece
Allows creativity to flow without client feedback, refinements or limitations
Attracts more of my ideal clients
Creates a polished and cohesive portfolio that will allow me to establish my style
It provides content for social media
Can help showcase my full creative skillset
Key elements and strategy for the briefs:
Mission/purpose: My concept briefs should have some type of mission or real purpose.
Vision: what does the fictional client for-see in the future & want to achieve through their brand?
Values: What type of client values and what type of values are their brand going to uphold?
Goals: What goals does my fictional client have and how am I going to help them get there through my designs?
Audience: Who is the target audience this brand is trying to attract?
Competitors: What competitors does the brand have? How is your concept going to be different?
My Concept projects should:
Solve a problem: for a concept brief to be “good” it must solve a problem that the ideal clients actively face.
Attract Clients: My concept briefs should be something that resonates with my ideal clients and showcases my creative abilities in their industry.
Seem Believable: The project should have enough work and a seemingly believable background story.
Be Portfolio Worthy: My concept briefs should be so well thought out that it belongs in my portfolio.
How will I be conceptualising briefs that will align with my ideal client?
The first step is to know who my ideal client is and what type of projects will attract them. From there I will determine the problems they face with their brand and weave that into my concept brief.
The brief should feel “familiar” to the client’s industry, resonate with them emotionally because of the problem at hand, and have a clear solution from my designs.
Hashtags
Throughout my research for Instagram tips, I kept reading articles and blogs about the importance of hashtags for a social media strategy and how the use of relevant hashtags can make all the difference in your Instagram reach and engagement. However, I would also find articles and blogs that mentioned how the new Instagram algorithm for 2022, focuses much less on hashtags and much more on SEO.
Taking both of these into consideration, I decided to start off my posts focusing on SEO and not as many hashtags and then see if I was happy with the reach and interaction my posts were getting. If not I would revisit my hashtag strategy and re-evaluate from there.
About four weeks into posting on my Instagram account, I realised from my analytics that I was not reaching many new accounts that were not following me and my post interactions were very low. This is when I decided to switch my hashtag strategy and test that out.
I started off the process by looking at some of my favourite design accounts that frequently showed up on my feed and ‘for you page’. I looked at the hashtags they were using on their posts, making a list of all the ones I thought could be relevant to my account.
After doing this for seven different Instagram accounts, I created a document where I listed all the hashtags and then proceeded to pick the ones I believed to be the most relevant and important for my account.
Below are the hashtags that I collected from my research:

The hashtags in bold are the hashtags that concept briefs accounts on Instagram use. I believe that these are the ones that help my posts reach such a large number of accounts.
Ever since using these hashtags in my posts, I have seen an extreme increase in my Instagram analytics. I will be discussing and analysing these further down in my feedback section.
Development
Development for the social media project includes my inspiration, mood board, colour choice, brand development as well as my plan and schedule for my content.
Inspiration
When looking for inspiration for my Instagram account, I knew that I wanted to look at other freelance brand designers and see how they set up their feeds. Below are the three designers that I have been following for a while now and have inspired me to try freelance design. I love their design aesthetic and their content, which is why I believe they will act as great inspirations for my own account.
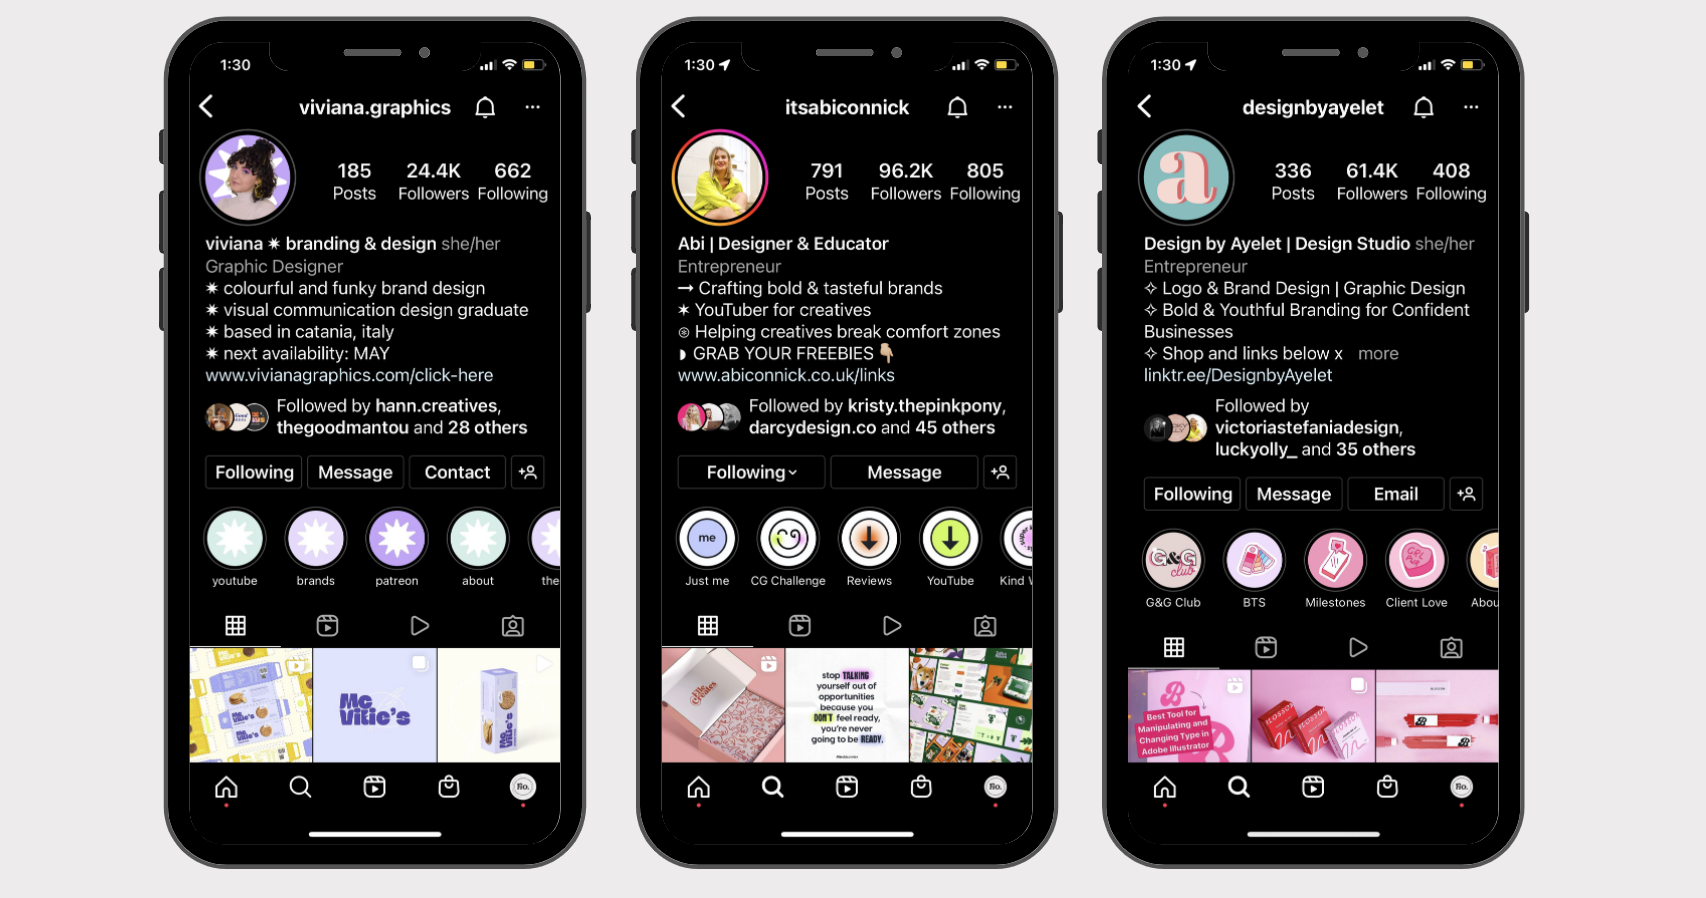
My favourite account and designer is Abi Connick, as she not only is a brand designer but also an educator. Abi posts youtube videos on her entire freelance process, from mood boarding to how she prices herself and everything in between. Having a professional, who has worked in the industry explain the entire process through well thought out and well-made videos is exactly what I need to help me start my freelance career.
Mood Board

This is the mood board I created from some of my saves on Pinterest to inspire and give me a feel of the aesthetics I wanted to include in my branding. The big trend at the moment in graphic design is the ‘Y2K’ style, which comes from the aesthetic that was popular in the early 2000s. It is typically characterised by bright and loud colours, bold and chunky fonts, gradients and grids.
Although this does not fit my design aesthetic, I want to use some of those elements and incorporate them into my branding to combine the trendy ‘Y2K’ style with my personal style.
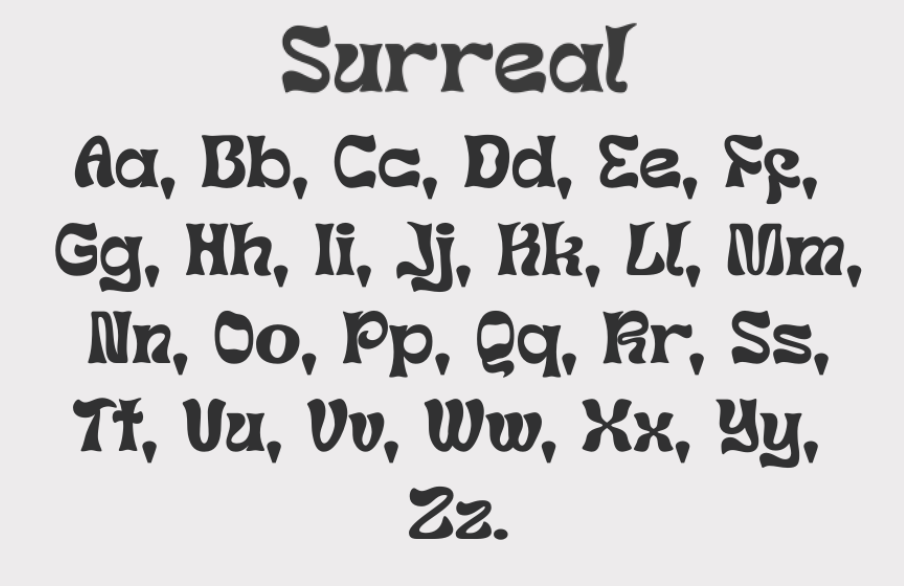
Font
I knew that for my font, I wanted to bring the ‘Y2k’ aesthetic into my branding and the font “surreal” was the perfect font for me. It had the bold and chunky look that is typically associated with ‘Y2K’ fonts, but it was not too obvious.
That’s exactly what I was looking for, as I wanted small details from the ‘Y2K’ trend, without making it obvious I was going for that aesthetic since I was trying to blend it with my own design style.

Primary Font

Secondary Font
As for the secondary font, I chose to go for the clean and simple font, Montserrat. Since my primary font was so bold and distinctive, I didn’t want the secondary font to clash with it. I knew the secondary font needed to be readable, clean and simple to create a nice contrast.
Initial Branding Ideas
When I first started designing for my brand identity, I was having trouble deciding on what to name it, as the name I chose would have to be the one my work was identifiable with and would affect my brand image and account name.
I knew that I did not want to use my full name as it is too long and hard to pronounce, and I also wanted to keep the account separate from my personal one for privacy reasons.
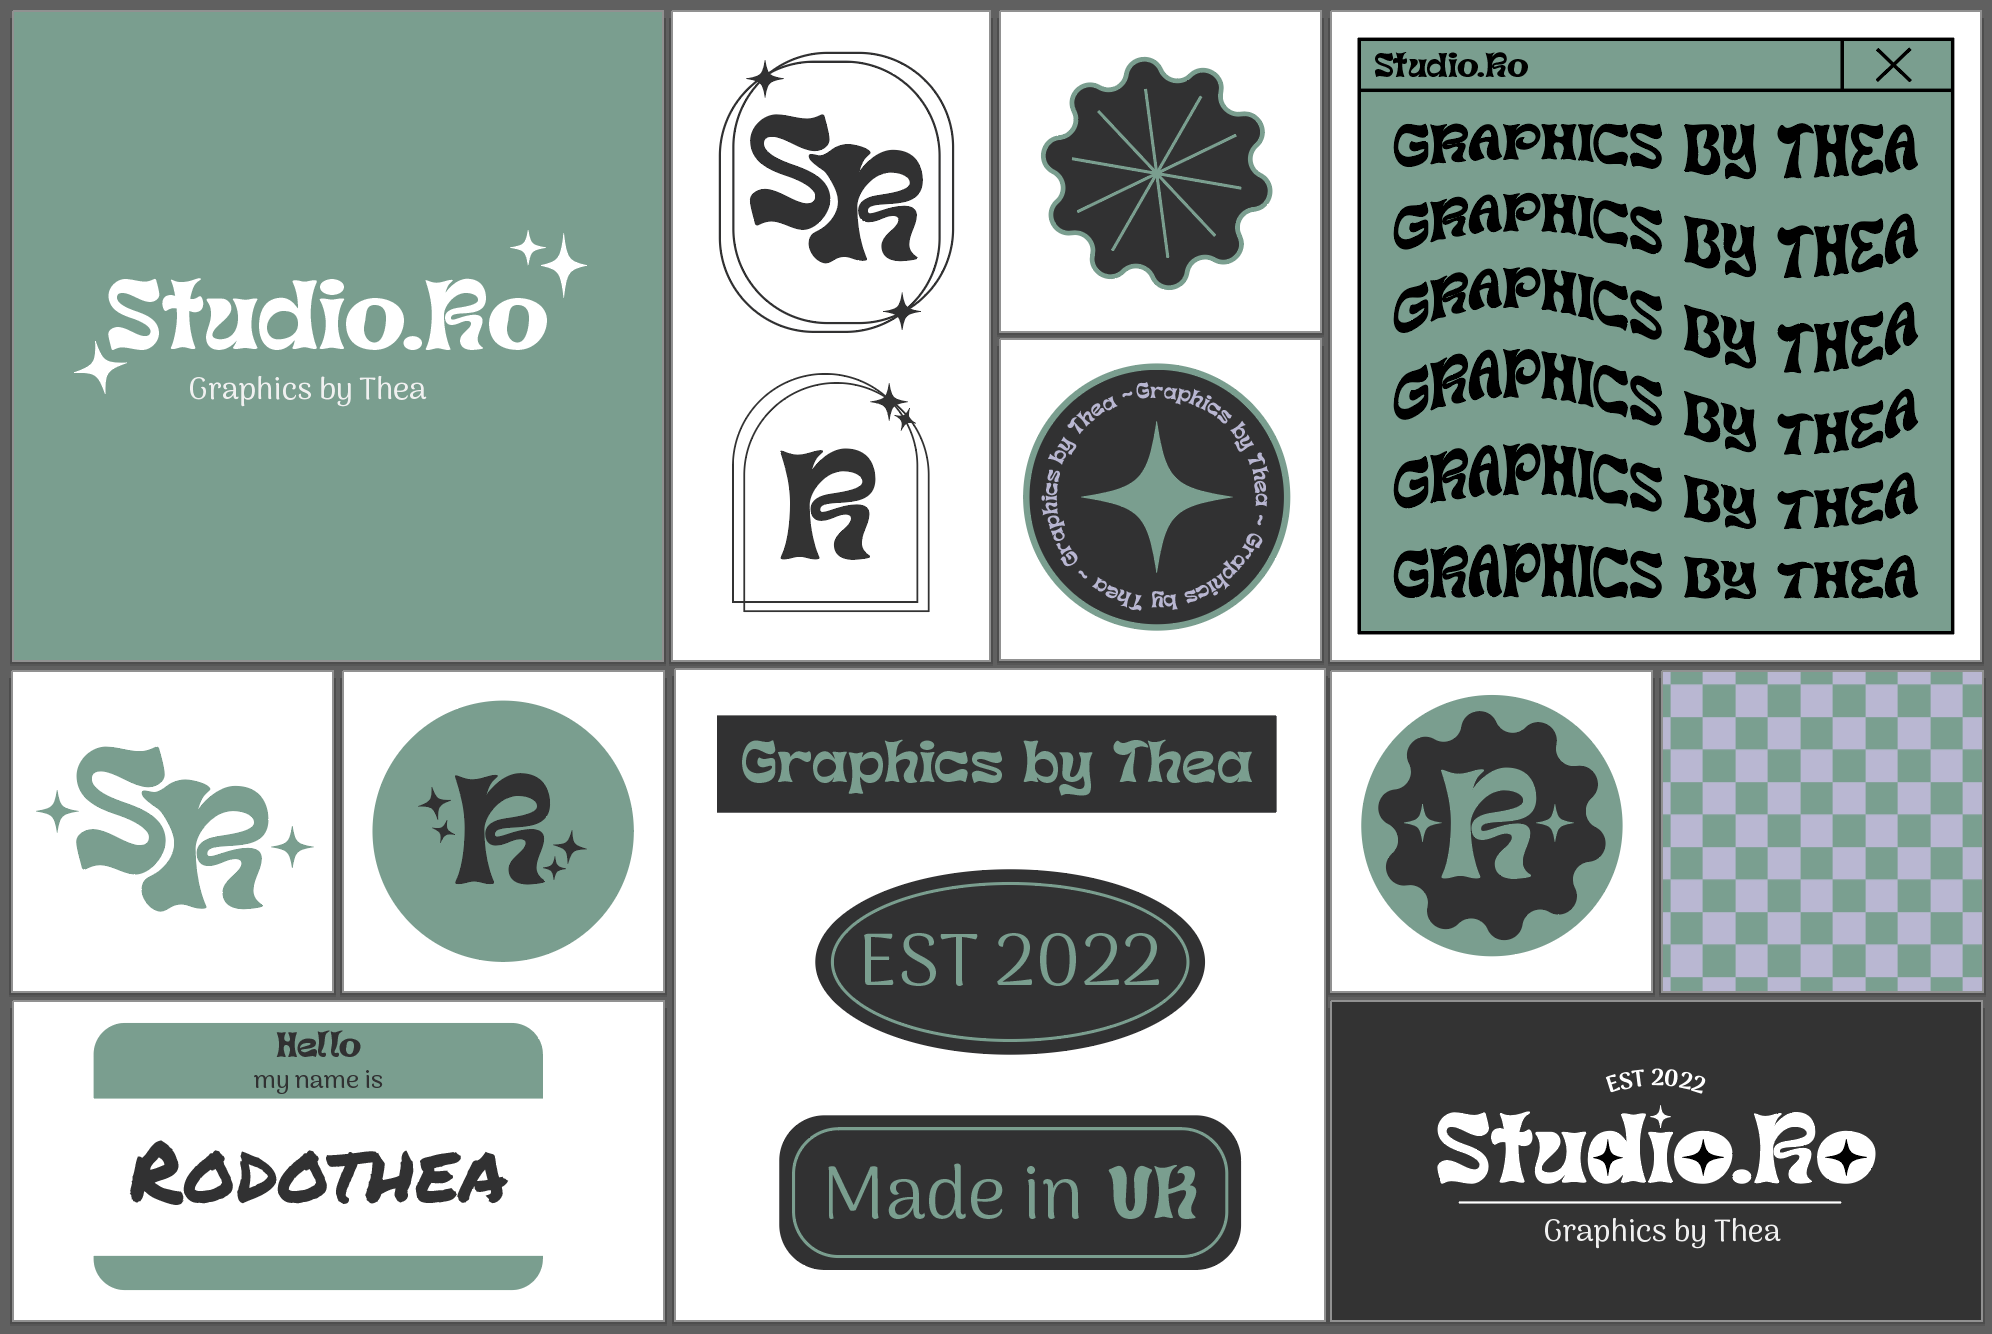
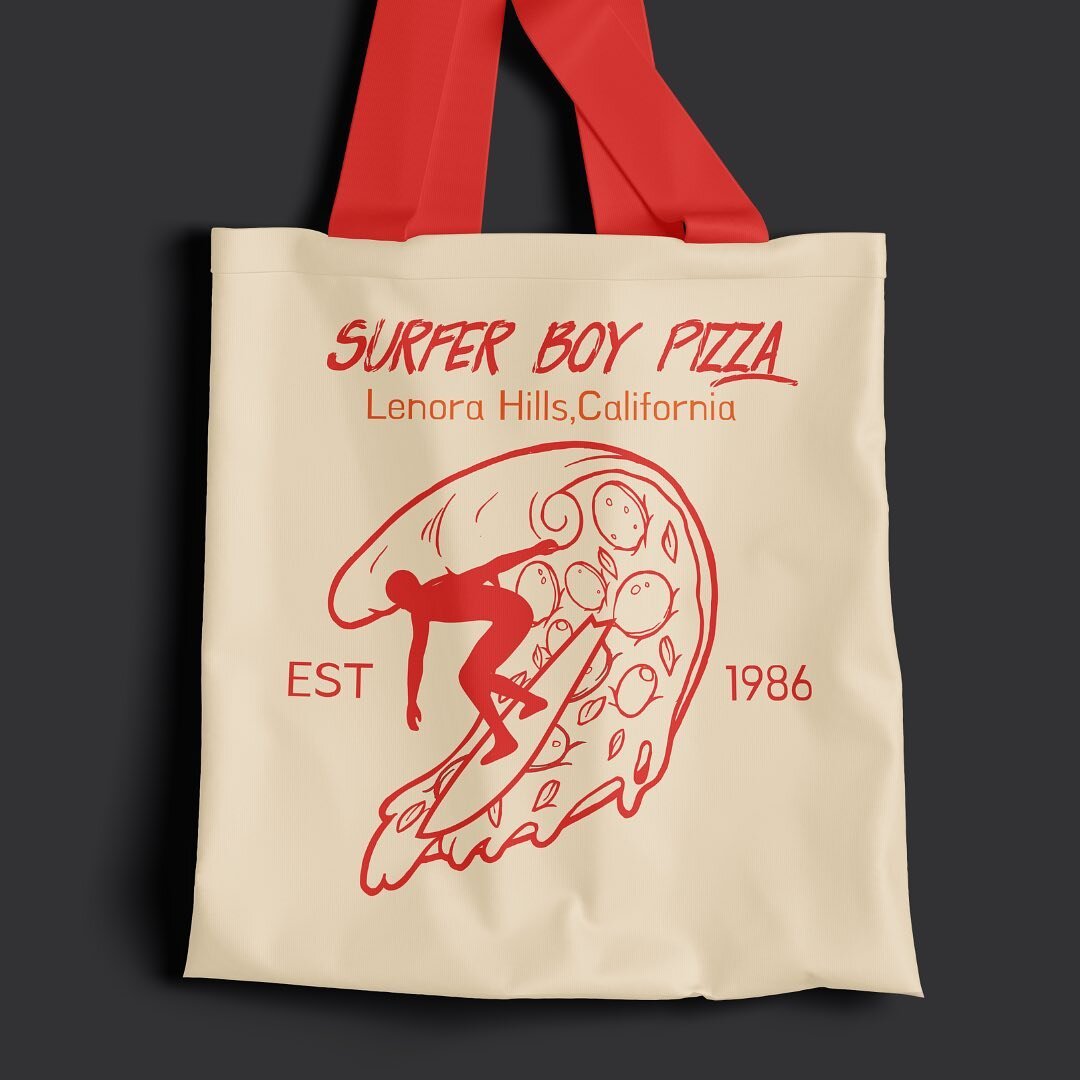
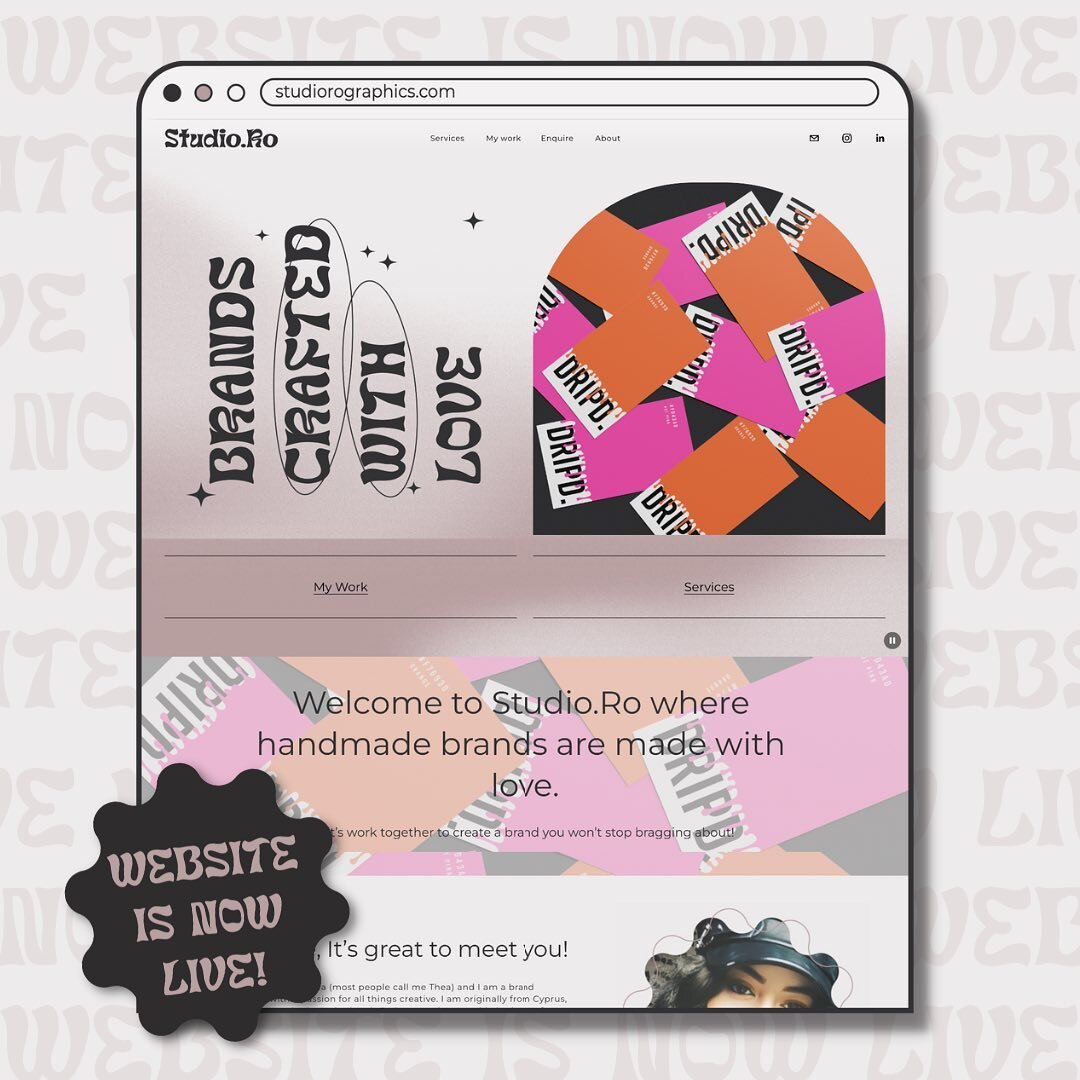
I decided to name the account Studio.Ro as this name allowed me to have both a professional and also personal feel to the name as the ‘Ro’ is taken from my first name Rodothea.

As seen from the pictures above, when I first started designing my brand identity, I was trying to stick to the brighter and bolder colours that I kept seeing show up in my research of the ‘Y2K’ aesthetic.
However, I was not liking how the colours did not match my personal aesthetic. It was important to me, since this branding was for me, to represent myself through it and not just follow a design trend. That is when I decided to re-evaluate my colour choices and revisit the branding once I decided on which colours I wanted to use.
Colours

As mentioned previously, I wanted to have elements of the ‘Y2K’ style in my branding but not in an obvious way. That’s why I decided instead of using the bright colours that I started out with for my branding, I would instead use more subtle colours.
As these colours were going to be used in all my social media work and as background colours for each of my posts to achieve the checkered grid design mentioned previously, I decided to use variations of black and white as my main colours. This was to ensure that non of my design work would clash with the colours of my branding. Having natural colours was a great way to not limit myself when it came time to design the concept briefs.
However, I did want to include some colour in my brand and decided to add a personal touch by choosing my favourite, dusty pink, colour as the accent colour.
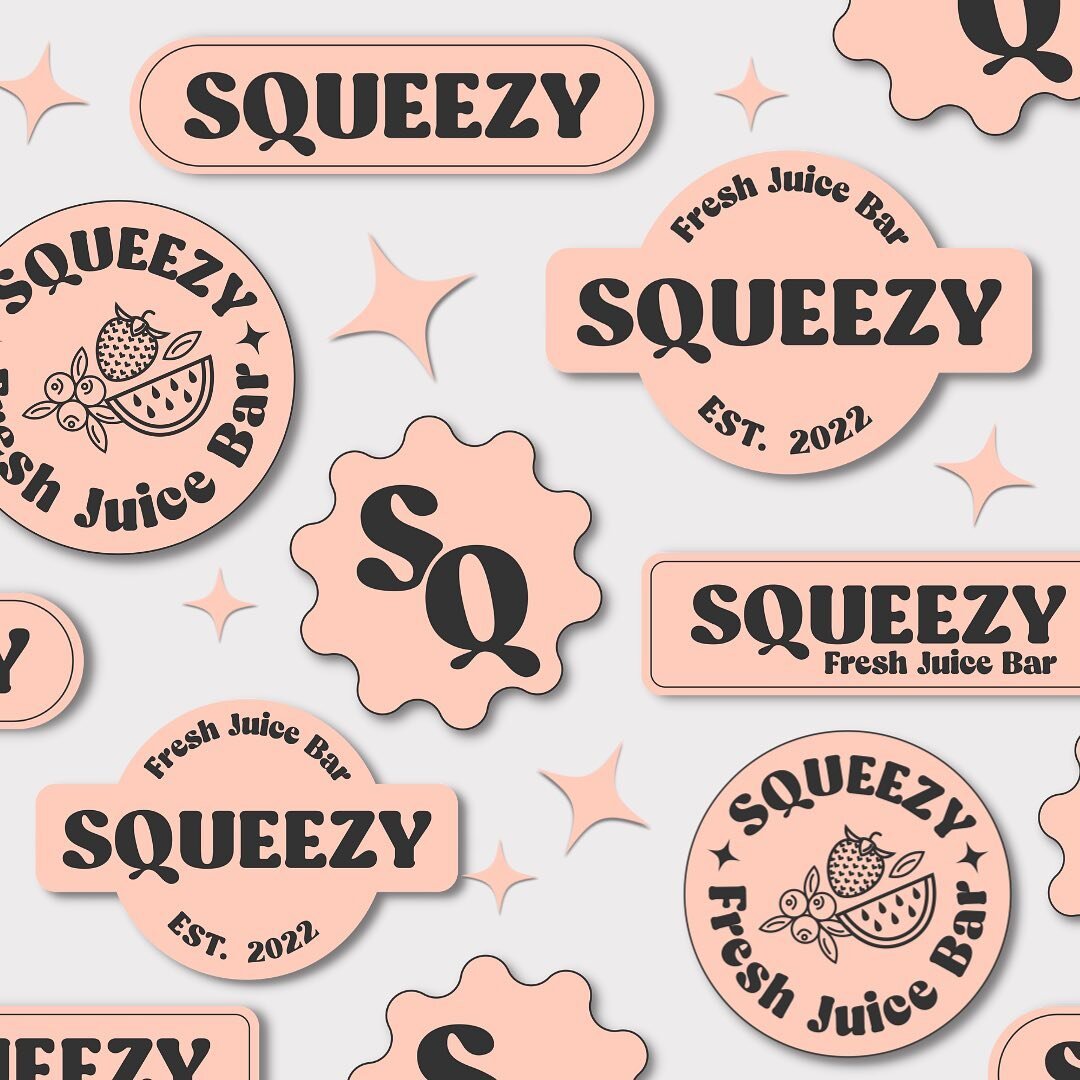
Final Studio.Ro Branding

After implementing all the changes and the new brand colours to my designs, this is what the final Studio.Ro branding looks like. I will be using this whenever I need to advertise my brand, in my social media posts and lastly on my website.
I truly love how my final branding ended up looking, as I feel like it really captured me and my design style, which was my goal all along.
Content to create
Before going live in week 7, I wanted to be as prepared and organised as possible. The first way I achieved that is by creating a list of possible content I could create, in case I ran out of ideas or wanted something other than concept projects to post. Below is the list of content ideas I created.

Posting Schedule
The second way I prepared to stay organised was by creating a posting schedule where I planned out a general outline for when and what to post. This would be for both Instagram and LinkedIn. I also used an app called Preview that helped me plan my Instagram content.


Prototyping
Prototyping for the project was not creating the traditional product, as there was none to create, but rather going live on the social media platforms and working on my social media strategy to grow my accounts.
Going Live
Week 7 was the week we were going live and I would finally use all my research and preparation.

Below are the links to my social media accounts:
Instagram Growth
The start of my Instagram account I will admit was slow. My followers were growing too slowly. I also noticed that my Instagram followers at the begging were my friends, family and fellow students on the course, which were not my target audience.
I had a meeting with Marina, our professor on the social media course, during week 9 and she pointed out that my content up until that point was not providing anything to my viewers or followers. It was mostly content introducing the Studio.Ro branding, or inspirational quotes. Essentially my content up until that point was not engaging or reaching people. That’s when I decided to re-evaluate my hashtag strategy (as mentioned previously in the hashtag section).
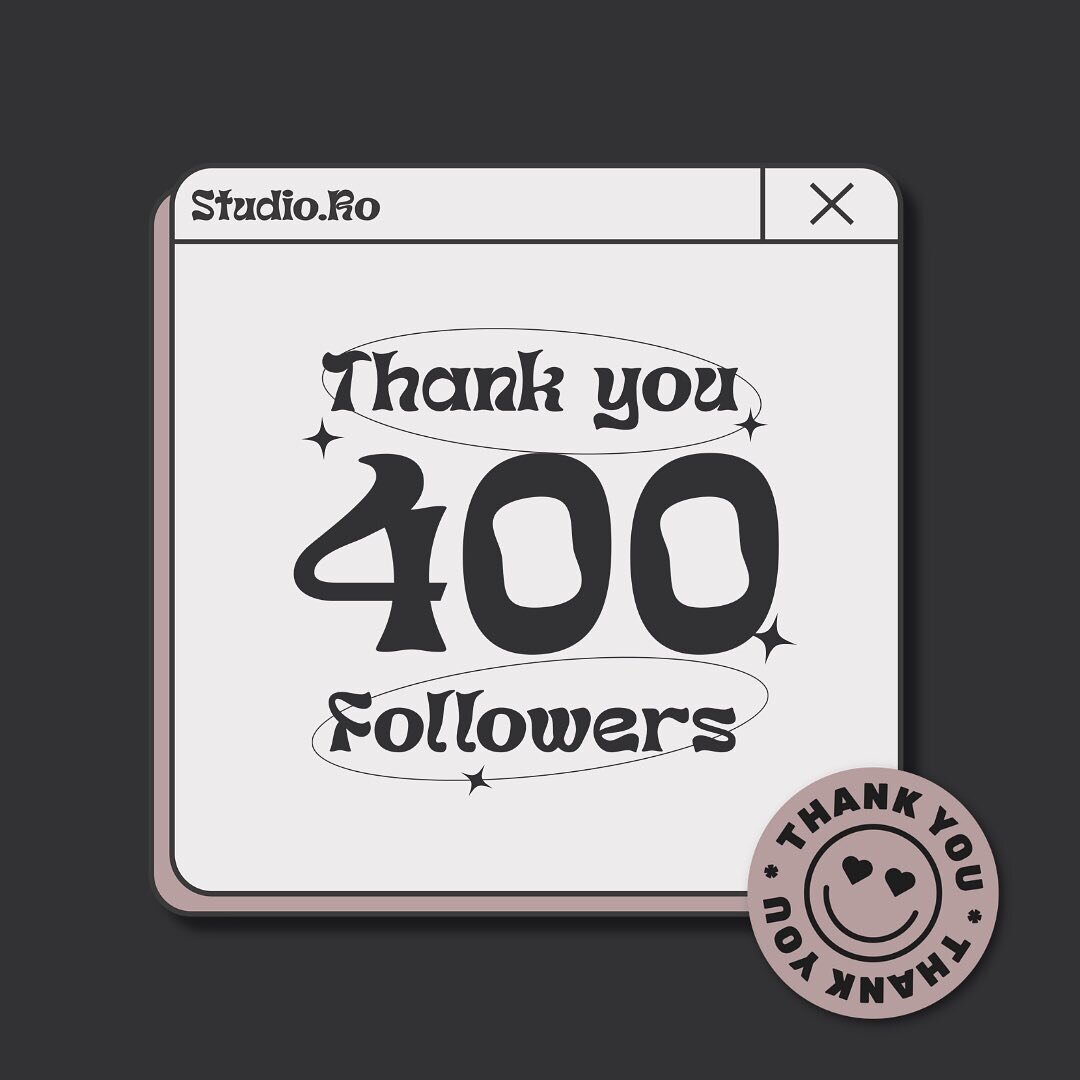
Ever since changing and using more hashtags in my posts, my account has reached over 33k accounts and has grown to over 400 followers. This proves that my new hashtag strategy paired with focusing my content purely on design briefs has worked fantastically for my Instagram.
As I will mention later on in my analytics, my account has really grown over the past couple of weeks and will hopefully keep growing and reaching the right audience.
Instagram Interactions

In the two months that my account has been live, I have received over 150 supportive comments for my work. I have responded to all of them as I found that it was a great way to interact with my followers and other accounts.
It was also important for me to respond to all of them since it was one of my social media strategy points, to actively engage with my audience.
Accounts that reached out
I not only had a lot of likes and comments, but I also had a few people direct message me. Below are some key messages I received.

Above is the message I got from an account asking to reshare my work on their account with over 11k followers.

This is a message that I received from an entrepreneur asking me if I was interested in a full time or part-time job. Even though I did reply that I was, they have yet to respond to me.
SDG 17

It was important for me to make sure that I kept in mind the UN Sustainability goal 17. A goal that is all about strengthening relationships through positivity in order to encourage sustainable development throughout all industries.
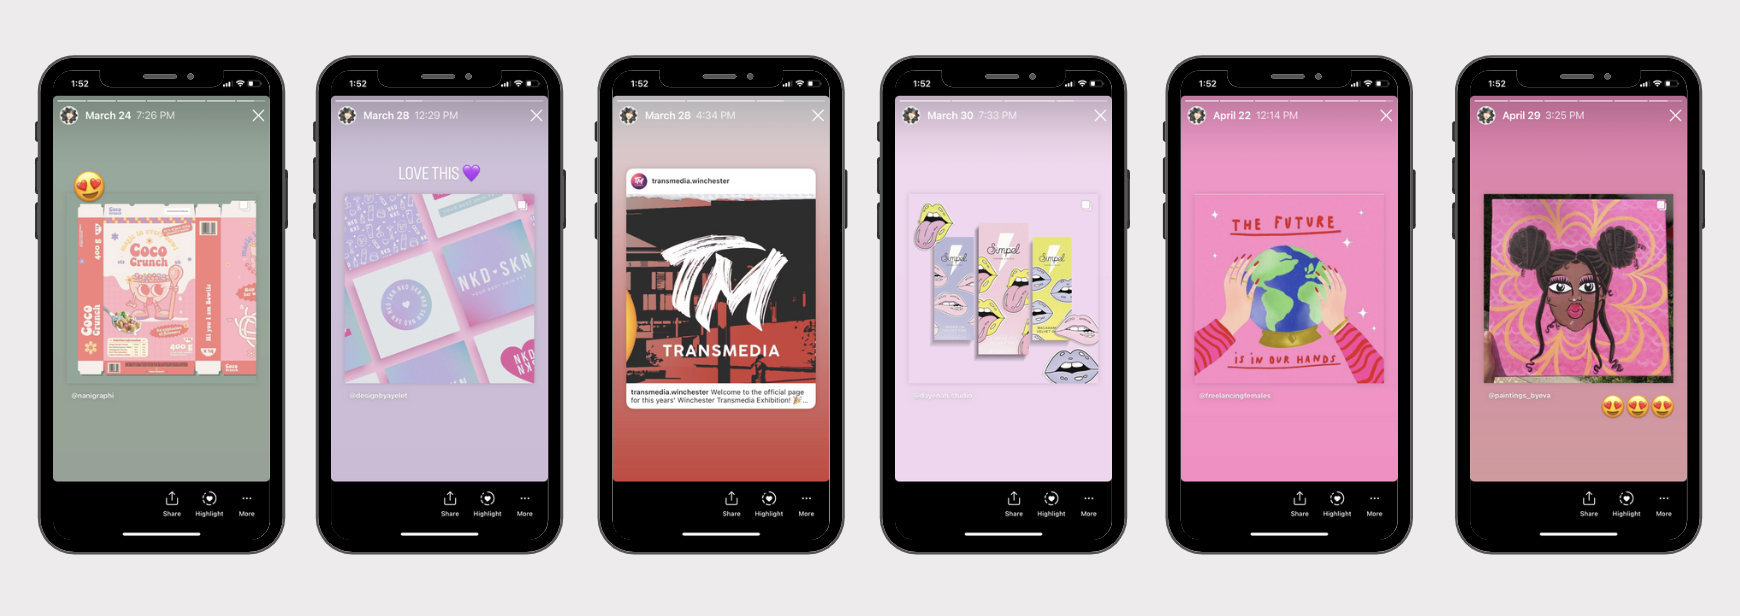
The way I did this in my social media project is by sharing other designers’ work that I thought deserved to be shared and celebrated. I also made sure to interact with accounts through liking and commenting on their posts and spreading positivity in the community. Below are just some of the work I shared on my stories.
Feedback
For this particular project, I found that the last step of ‘testing’ was switched around with the prototyping stage as there is where my research and social media strategy was put to the test. For this project, I replaced the testing stage for feedback, analytics and my reflection on the project.
Analytics
The last stage of the design process is feedback and when it comes to social media accounts there is no better feedback than looking at the analytics of the account. This next section will be breaking down the analytics from both my Instagram and Linked accounts to analyse whether my social media strategy was successful.
The following analytics are up to the 7th of May, two months exactly after going live on the accounts.
Instagram Analytics


Just from looking at the above analytics, I can confidently and proudly say that my social media strategy was successful for my Instagram account. The fact that I achieved these analytics in just two months of running the account is crazy to me and proves that I am doing something right and that I should definitely continue with my current strategy.

Above is the overall look of my Instagram statistics and milestones.
So what was the key factor that lead to these statistics? After analysing my social media strategy, I have concluded that the combination of changing my hashtag strategy, focusing my content on project briefs and continuously interacting with my account is the reason behind the above statistics.
Breakdown of Instagram Analytics
Reach

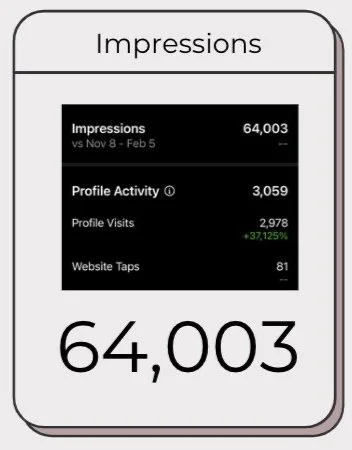
Above is the breakdown of my Instagram account reach. As seen above I reached over 38.7k just through my posts. This is from the hashtags that I switched to a few weeks into the project.
Using the concept briefs hashtags from the different accounts, helped my account reach the other thousands of accounts that follow those hashtags. This can be seen from the analytics on the far right, which show my top posts according to their reach. Almost all of those posts are concept briefs where I used those hashtags as well as tagged the concept briefs accounts.
Engagement

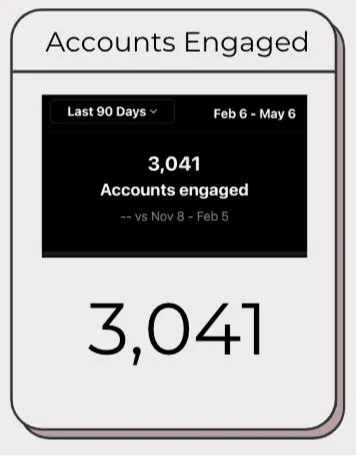
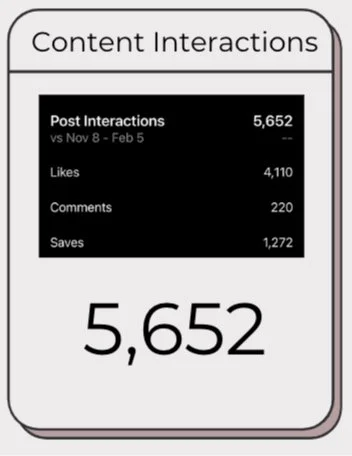
A natural progression from the 33k accounts reached is gaining engagement from all those accounts and I had a total of 5,797 engagements. Engagement includes all the likes, comments, and saves my account got over the two months of being live.
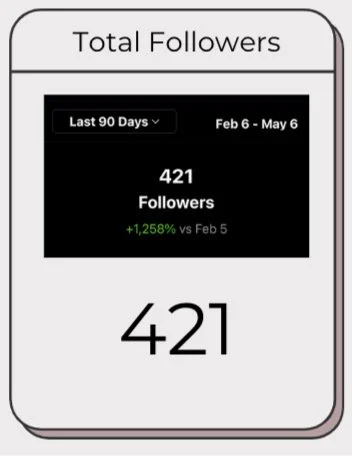
Followers
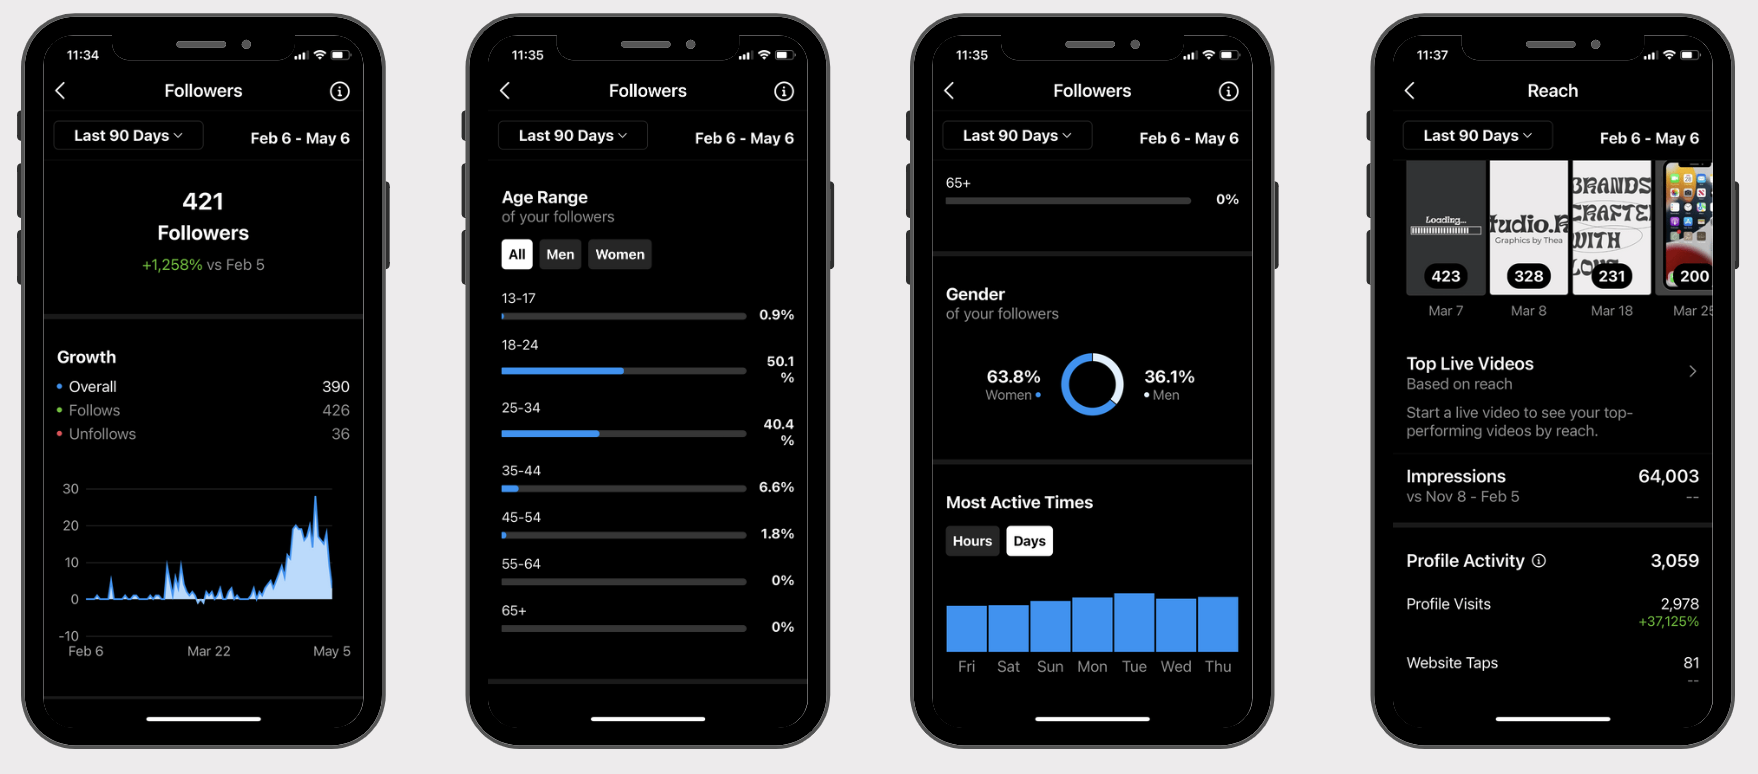
This is the breakdown of my follower analytics. These helped me see if my content was reaching my target audience of females, between the ages of 18-35. As seen above the ages 18-24 are the highest with a very close second the ages 25-35, proving that I am reaching the age demographics for my target audience. The gender analytics also show that I reached my target audience with 63.8% of my followers being female.
Top Posts

I then went on to look at my top posts according to comments, followers gained, profile visits and saves. This was very helpful for me to see which types of posts were engaged with the most among my followers. This will also guide me as to which posts to keep creating and what aesthetic to use.
Most of my top posts in all 4 categories are concept brief posts, which lets me know that I need to keep focusing my content on those if I want to keep growing my account.
Top Performing Post
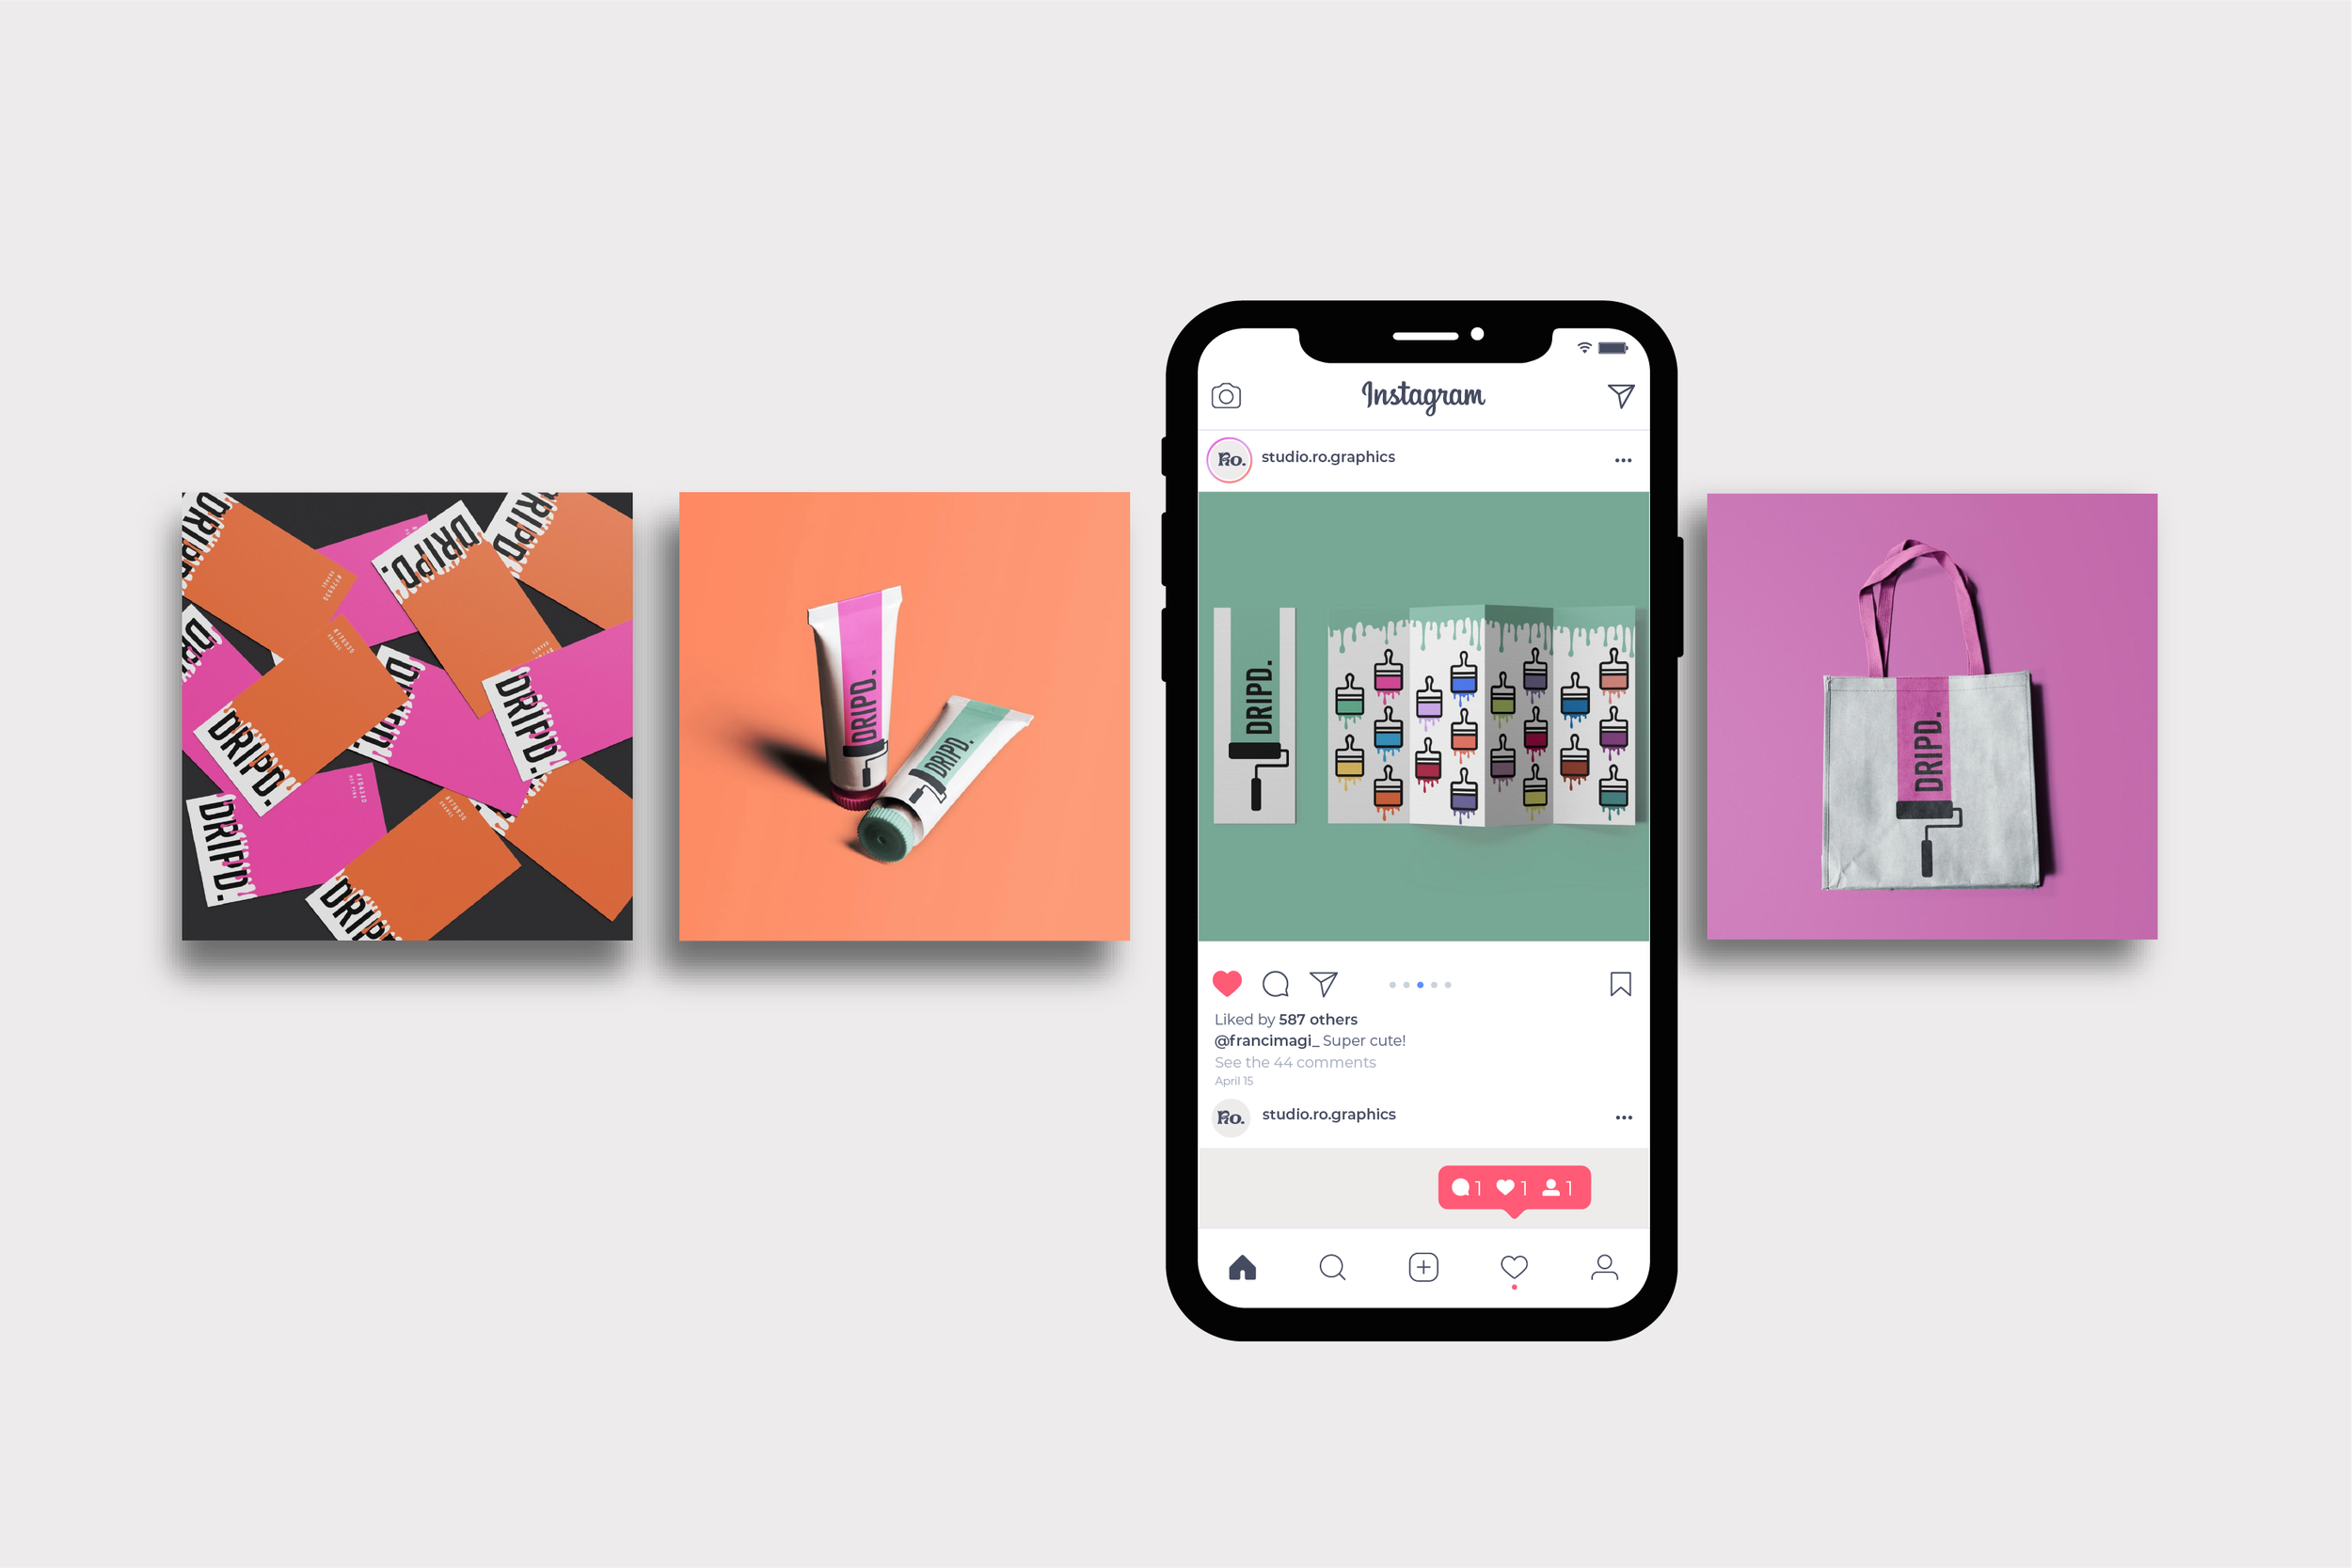
Above is my best performing post. This post was for a concept brief posted by the @briefclub where the brief was to create the branding for a paint shop. The post got 587 likes so far, 232 saves and 44 comments. It also got me 90 new followers and 260 profile visits.
Linked In Analytics

These are my Linkedin Analytics. They are much less detailed than Instagram’s as LinkedIn does not have an extensive analytics section.
My LinkedIn analytics are significantly lower than my Instagram, and I was expecting that, especially when I look back at how little I posted and used LinkedIn. It was not a platform that I felt comfortable using and if I’m honest I just did not enjoy it as much as Instagram. That lead to me spending less time focusing on LinkedIn and more time on Instagram. However, I do think that for how little I posted on Linkedin, the statistics could be much worse.
One of my goals moving forward is to spend some time learning and familiarizing myself with LinkedIn because even if I did not enjoy using it so far, I do understand its importance when it comes to job hunting, especially in the design industry.
Feedback
Throughout the project, I was constantly seeking feedback, whether it was from my social media professors, Marina and Tina, looking at my analytics to make sure my posts were successful or even asking friends and family about my accounts.
It was from my meeting with Marina that I decided to change my content and hashtag strategy which lead to amazing results and a growing Instagram account.
I also got a handful of pleasant comments and feedback from my fellow students, congratulating me on my growth on Instagram.
Overall, the feedback I received throughout the project was positive and encouraging and it was what kept me trying when creating content and posting got too much for me and my schedule.
Reflection
Looking back on my social media project, I am extremely happy with the outcome and proud of the success I have had so far with my Instagram. Growing my Instagram to over 400 followers in two months is amazing to me and hopefully, I can keep it growing up over the summer.
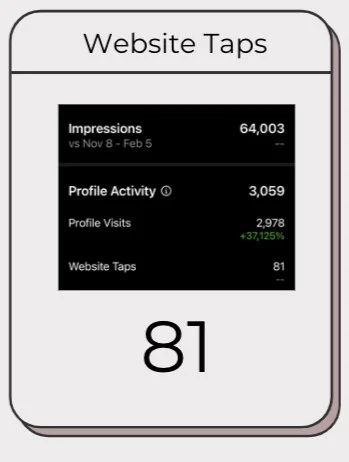
Not only has my following grown, but I also started interacting with the industry I hope to pursue when I graduate, giving me great exposure and opportunities to make connections. I had over 80 website clicks from Instagram alone, meaning that I drove traffic to my website and my university work as well.
However, achieving those results was not without a cost as it definitely took a lot of time and effort. It was very hard work to create a good quality branding project every week and balance out my schedule between university work, my part-time job at an online magazine and also finding time for my social life outside of work. I definitely lost track of my posting schedule due to this, but I soon realized that no one else knew what and when I wanted to post so as long as I was consistent with posting, it would still work out.
I learned that creating and posting content consistently is a true skill I need to master if I want to have a successful presence on social media, which I do plan on continuing, as I believe it will help me tremendously once I graduate next year.
If I could go back and change something about my social media project it would be to be much more prepared before going live and batch making my Instagram posts. In saying so, I also realize that there was no way for me to have known before going live how difficult and time-consuming the concept briefs were going to be. Especially since I changed my strategy to posting only concept briefs after I went live on my accounts.
I have to admit that LinkedIn was not a platform I enjoyed using. The user interface was new and unfamiliar to me, unlike Instagram, and I did not like posting and interacting with content on LinkedIn as much as I did on Instagram. It was a much more serious platform and I almost felt intimidated by it.
Reflecting on that, I now realize how once my Instagram started growing and I started seeing results there, LinkedIn become more of an afterthought for me, posting just for the sake of posting for this project, whereas with Instagram, I wanted to post my content and see my followers interact with it.
In conclusion, I am very proud of myself and what I was able to achieve with my social media accounts in such a short period and I can’t wait for them to keep growing.
Moving Forward
Moving forward I plan to keep posting on my Instagram and LinkedIn throughout the summer as I want to keep growing my followers and connections. I also want to start experimenting with reels on Instagram as they seem to be the trend at the moment. I also plan to expand my social media reach by creating social media accounts on other platforms such as TikTok and Pinterest.